HMMWV Project
Page 1: RTR Original
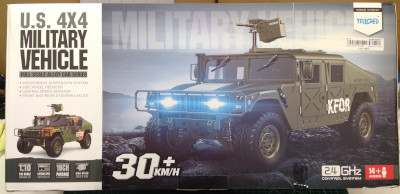
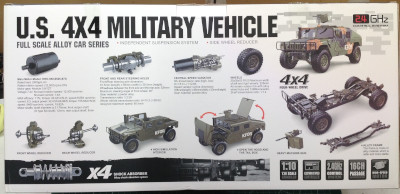
The box is pretty impressive and well decorated. The back includes
details on all the features of the model in broken English. There
are a lot of power, torque, current, and speed specs on the motor which
is way more information than usual. On the other hand, basic
information like turn count is not provided. Based on the other
specs, I'm assuming this is roughly a 27 turn brushed 550 motor.
The open differentials are all metal and can be locked via insertion of a
pin. The transmission is a 2-speed unit with steel gears.
Like the real Hummer, the suspension is independent with portals on all
four corners. The frame is a metal ladder frame type.
The side panel of the box contains a brief history of the real M1025
HMMWV. The English is much better here suggesting this text was
taken from some other source. Inside the box is a foam case for
the model and the included 16-channel twin stick transmitter. This
case protects the model very well and makes it easy to transport
safely. The box is made from a high density foam with a hinged
lid, carrying handle, and embedded magnets to hold the lid shut.
The only problem is that it is very hard to remove the model from the
case because there is not much exposed structure to grab on to.
The roof mounted gun must be removed when using the case, but it still
fits inside under the model.
The hard plastic body of the HMMWV model has a wealth of detail both
inside and out. We'll start with the hood. The hood has real
metal latches on the sides. Once those are released, the hood can
swing forward to reveal a faux engine bay including a radiator under
the hood vent. This engine is one piece which can also swing open
to provide access to the electronics bay. On the real HMMWV, the
front grille is fixed and does not rotate with the hood.
All four doors can be opened and use spring loaded latches. On the
inside, the doors have panels and arm rests. Some Humvees have
additional armor plating on the door and over the side windows, but this
model does not simulate that package.
The seats have cushions that are actually cushioned. The area you
see in black seem to be some kind of rubber. There's a full dash
including gauges and steering wheel, and there is a radio on the center
console. The black diamond plate platform you see between the
black seats allows a gunner to stand and use the roof mounted armament.
The turret on the roof can swivel and uses a ratchet system to lock into
position. The gun can be rotated vertically and
horizontally. The armored hatch can be folded open allowing access
to the gun. The gun itself is metal while the ammo can is
plastic.
The rear hatch and tail gate can open to reveal the cargo area.
There is a large crate inside which serves to hide the battery.
There are also spare weapons back there, but they are bolted down to
cannot be easily removed. The hatch is held open with spring
cartridges.
The tail gate is held shut with pins hanging from real chains. The
tail lights include turn signals, markers, brake lights, and reverse
lights. On the front are headlights, markers, and turn
signals. The extra light on the left side is apparently an
infrared emitter on the real vehicle.
Additional details include windshield wipers, lift points, side mirrors,
and a snorkel. The model has as much detail as you could wish
for.
The body can be separated in one piece by removing only 6
screws. Out of the box, the model is entirely desert tan
including the chassis. I found this a bit monotonous and, based on
the reference photos I could find, the chassis should actually be
black. I knew that if I painted it black while assembled I would
miss a lot of things and some things would get painted that
shouldn't. Even though this model is RTR, it comes with a full
construction manual
and therefore it is a simple matter to tear it down as far as desired to
paint and rebuild. I took it substantially apart and used flat
black. The first picture on the left shows the chassis as it
arrived, but with all the electronics removed. On the right you
can see the frame with the paint completed.
The front and rear differentials are identical. I did not open
them up, but the instructions reveal that they are open planetary
type. Both gears and housing are metal and full ball bearings are
used throughout, and the assemblies are very heavy. There's
an access port that allows insertion of a locking pin if desired.
This greatly improves off road performance but limits turning
radius. The picture on the right shows the differential housings
installed on the chassis frame.
The next thing I worked on was the transmission. I opened it up to
check for proper lubrication but otherwise did not rebuild it. I
did find several loose screws stuck to the motor magnets and interfering
with the rotor, so I'm glad I took this thing apart. The
transmission uses a first stage planetary reducer with a driven sun
gear, a fixed ring gear, and the planet carrier as output. I was
surprised to see that the reducer was upstream of the shifting mechanism
rather than downstream which forces the shifter to carry much more
torque. The central shaft uses a single shift fork to switch
between high and low gears. The transfer case is integral to the
transmission with separate front and rear output shafts. The
resulting transmission and motor assembly make up the heaviest part of
the model. The instruction manual refers to "batholith parts" when
showing the gears, but I haven't been able to come up with any useful
explanation for that translation. The right hand picture shows the
bottom of the chassis with the transmission and drive shafts
installed. The drive shafts are heavy duty steel units.
There's really no need for them to telescope since the differentials are
fixed to the frame, but some of them have that capability anyway.
The rear driveshaft also has a mid-span bearing support. The rear
drive shaft has a rather extreme u-joint angle.
According to the manual, low gear is 28:1 while high gear is ~15:1 so
there is an almost 2x speed difference between gears. The pictures
above from the manual show the torque path from the motor, through the
planetary reduction, into the primary shaft, and then into the forward
and rear output shafts in parallel.
The exhaust is made up of real bent metal tubing. It snakes around
the chassis quite convincingly. The exhaust exit is low
suggesting this model does not have the deep water fording kit which
uses a high exhaust stack exiting above the roof. On the other
hand, this model does have a snorkel which implies it does have the deep water kit. I guess that's a consistency error.
Here's the rear suspension which uses a cross brace and double
wishbones. The axles are dogbones on the outboard end and CVDs on
the inboard end. The shocks are nice metal spring cartridges but
they are not oil filled. The hubs are portal hubs which contain
internal gearing to increase the gear ratio and raise the level of the
differential housing further above the axle for more ground
clearance. All of the suspension parts added in this step are
metal, either cast or machined.
The front suspension is similar to the rear but with the obvious
addition of steering. The steering is a dual bellcrank type with
an idler arm and Pitman arm. The Pitman arm attaches directly to
the 15kg-cm steering servo. The cranks are among the very few
plastic mechanical parts. The steering geometry features mild
Ackerman correction.
The wheels are metal beadlocks with realistic rubber tires and internal
foams. The wheel cover goes over the top of the nut, meaning that
you have to remove all 8 screws securing the cover before attempting to
remove the wheel. It looks really good though, appearing to be 8
lug nuts. Installation of the wheels and tires completes the
rolling chassis.
The electronics that come with the model aren't bad. There is a
15kg-cm metal gear waterproof steering servo and a mini shift
servo. The brushed ESC is claimed to be good for 160A though I
can't imagine that can possibly be true. The manual says to only
use 7.4V (2s) but I didn't read that until I'd already run the model on
3s so I can confirm it works fine. The model comes with a 16
channel transmitter and receiver, but only 3 channels are in use out of
the box. Even though I am not fond of twin stick transmitters, I
was tempted to keep using it to make use of many channels worth of
upgrades. However, the transmitter is not programmable so I
couldn't set end points or exponential. In the end I used a 5
channel receiver for my usual Spektrum radio. This gives the
throttle, steering, transmission, lights, and horn. (The 6-channel receiver shown in the pictures was later replaced.)
I thought the paint used on the model was a bit too glossy so I masked
the windows and went over the whole thing with flat clear. I think
this gives it a bit more weathered texture. I also added the
decals which were quite difficult to apply over the ridged paneling on
the doors.
The final model with my updated paints and stickers. It doesn't
look all that different at first glance, but if nothing else I had a lot
of fun rebuilding it.
©2019 Eric Albrecht

